Zuni Roast Chicken with Bread Salad
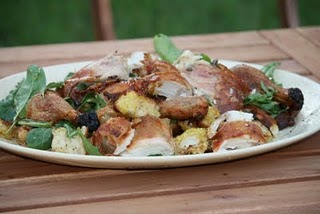
Some people claim that the roast chicken at Zuni in San Francisco is THE BEST roast chicken dish around and I have to agree. I have made dozens of roast chickens before but this one is by far the tastiest way to make roast chicken. The secret is to do a salt “brine” on the chicken for a couple of days before you cook it. The salt adds flavor and moisture to the chicken via osmosis.
Another secret is to thoroughly pat the chicken dry before cooking it. This ensures a super crispy skin. I also LOVE the bread salad so I always double that portion but you can decide on your own if you want to do that.
INGREDIENTS
For the chicken:
- One small chicken, 2-3/4 to 3-1/2-pounds
- 4 tender sprigs fresh thyme, marjoram, rosemary or sage
- Salt (about 3/4 tsp per lb of chicken)
- About 1 teaspoon freshly cracked black pepper
- A little water
For the salad:
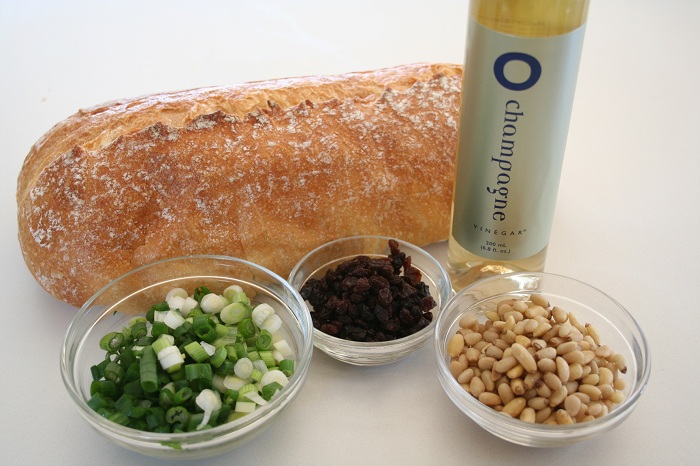
- 1 loaf slightly stale, chewy, peasant-style bread (not sourdough)
- 6 to 8 tablespoons mild-tasting olive oil
- 2 tablespoons Champagne vinegar or white wine vinegar
- Salt and freshly cracked black pepper
- 2 tablespoon dried currants
- 1 teaspoon red wine vinegar, or as needed
- 1 tablespoon warm water
- 4 tablespoons pine nuts
- 3-4 garlic cloves, slivered
- 1/4 cup slivered scallions (about 4 scallions)
- 2 tablespoons lightly salted Chicken Stock or lightly salted water
- A few handfuls of arugula, frisée, or red mustard greens
DIRECTIONS
Seasoning the chicken (Do 1 to 3 days before serving; for 3-1/4- to 3-1/2-pound chickens, at least 2 days)
Remove and discard the lump of fat inside the chicken. Rinse the chicken and pat very dry inside and out. Be thorough-a wet chicken will spend too much time steaming before it begins to turn golden brown.
Approaching from the edge of the cavity, slide a finger under the skin of each of the breasts, making 2 little pockets. Now use the tip of your finger to gently loosen a pocket of skin on the outside of the thickest section of each thigh. Using your finger, shove and herb sprig into each of the 4 pockets.
Season the chicken liberally all over with salt and pepper {we use ¾ teaspoon of sea salt per pound of chicken}. Season the thick sections a little more heavily than the skinny ankles and wings. Sprinkle a little of the salt just inside the cavity, on the backbone, but don’t otherwise worry about seasoning the inside. Twist and tuck the wing tips behind the shoulders. Cover loosely and refrigerate.
Starting the bread salad (Can be done up to several hours in advance)
Preheat the broiler.
Cut the bread into a couple of large chunks. Carve off all of the bottom crust and most of the top and side crust. Reserve the top and side crusts to use as croutons in salads or soups. Brush the bread all over with olive oil. Broil very briefly, to crisp and lightly color the surface. Turn the bread chunks over and crisp the other side. Trim off any badly charred tips, then tear the chunks into a combination of irregular 2- to 3-inch wads, bite-sized bits, and fat crumbs. You should get about 4 cups.
Combine about 1/4 cup of the olive oil with the Champagne or white wine vinegar and salt and pepper to taste. Toss about 1/4 cup of this tart vinaigrette with the torn bread in a wide salad bowl; the bread will be unevenly dressed. Taste one of the more saturated pieces. If it is bland, add a little salt and pepper and toss again.
Place the currants in a small bowl and moisten with the red wine vinegar and warm water. Set aside.
Roasting the chicken and assembling the salad.
Preheat the oven to 475. Depending on the size, efficiency and accuracy of your oven, and the size of your bird, you may need to adjust the heat to as high as 500 or as low as 450 during the course of roasting the chicken to get it to brown properly. If that proves to be the case, begin at that temperature the next time you roast a chicken. If you have a convection function on your oven, use it for the first 30 minutes; it will enhance browning, and may reduce overall cooking by 5 to 10 minutes.
Choose a shallow flameproof roasting pan or dish barely larger than the chicken, or use a 10-inch skillet with an all-metal handle. Preheat the pan over medium heat. Wipe the chicken dry and set it breast side up in the pan. It should sizzle.
Place the center of the oven and listen and watch for it to start browning within 20 minutes. If it doesn’t, raise the temperature progressively until it does. The skin should blister, but if the chicken begins to char, or the fat is smoking, reduce temperature by 25 degrees. After about 30 minutes, turn the bird over — drying the bird and preheating the pan should keep the skin from sticking. Roast for another 10 to 20 minutes, depending on size, then flip back over to re-crisp the breast skin, another 10-20 minutes. Total oven time will be 50 minutes to an hour+ depending on the size of your chicken. (If you have a bigger chicken, obviously the time in the oven will be longer).
While the chicken is roasting, place the pine nuts in a small baking dish and set in the hot oven for a minute or two, just to warm though. Add them to the bowl of bread.
Place a spoonful of the olive oil in a small skillet, add the garlic and scallions, and cook over medium-low heat, stirring constantly, until softened. Don’t let them color. Scrape into the bread and fold to combine. Drain the plumped currants and fold in. Dribble the chicken stock or lightly salted water over the salad and fold again. Taste a few pieces of bread-a fairly saturated one and a dryish one. If it is bland, add salt, pepper, and/or a few drops of vinegar, then toss well. Since the basic character of the bread salad depends on the bread you use, these adjustments can be essential.
Pile the bread salad in a 1-quart baking dish and tent with foil; set the salad bowl aside. Place the salad in the oven after you flip the chicken the final time.
Finishing and serving the chicken and bread salad.
Remove the chicken from the oven and turn off the heat. Leave the bread salad to continue warming for another 5 minutes of so.
Lift the chicken from the roasting pan and set on a plate. Carefully pour the clear fat from the roasting oven, leaving the lean drippings behind. Add about a tablespoon of water to the hot pan and swirl it.
Slash the stretched skin between the thighs and breasts of the chicken, and then tilt the bird and plate over the roasting pan to drain the juice into the drippings.
Set the chicken in a warm spot and leave to rest while you finish the bread salad. The meat will become more tender and uniformly succulent as it cools.
Set a platter in the oven to warm for a minute or two.
Tilt the roasting pan and skim the last of the fat. Place over medium-low heat, add any juice that has collected under the chicken, and bring to a simmer. Stir and scrape to soften any hard golden drippings. Taste-the juices will be extremely flavorful.
Tip the bread salad into the salad bowl. It will be steamy-hot, a mixture of soft, moist wads, crispy-on-the-outside-but-moist-in-the-middle-wads, and a few downright crispy ones. Drizzle and toss with a spoonful of the pan juices. Add the greens, a drizzle of vinaigrette, and fold well. Taste again.
Cut the chicken into pieces, spread the bread salad on the warm platter, and nestle the chicken in the salad.
